June 3, 2021
dog
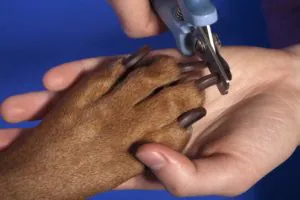
Trimming dog’s nails
You’re sitting down in your living room when you hear a very…antique sound.
Click clack click clack.
It almost sounds like a typewriter.
You look around and immediately identify the culprit: Fido. His nails are as long as a limousine and that sound is the sound of him walking around!
You may begin to wonder: is that okay? Should his feet be able to announce his entrance into a room like that? Or should his nails be a touch more prim and proper?
The answer is that trimming a dog’s nails is a MUST to ensure that he remains happy and healthy. We’ll go into the details of why that is, as well as how to trim this overgrown nails, in the quick blog below.
Why It’s Important to Trim Your Dog’s Nails

Dogs have a difficult time walking with long nails.
We know what you’re thinking: “I’ve skipped getting my nails done before and it never hurt me! You mean to tell me that my dog might be at risk of some sort of health issues if his nails don’t look good?!”
Yes! Exactly that, actually!
Veterinarians have warned for decades now that unhealthy nails not only cause pain but can actually lead to irreversible damage to your dog. This is because neglecting to trim your dog’s nails means that the “quick” has time to grow unfettered.
As your dog’s nails get longer, his toes will begin to splay as they hit the ground, putting additional force on his foot and leg which can cause injury to the tendons over time.
Beyond the potential negative health consequences, long nails just make it uncomfortable for your pup to walk!
Since walking with long nails puts more pressure on their nail bed with each step, he’ll have to distribute his weight differently to be able to comfortably proceed. If you’ve ever had an ingrown toenail, then you should know exactly the kind of discomfort we’re talking about.
How Often Should You Trim Your Dog’s Nails?
There’s no absolute, right answer to this question. The amount of time you should let pass between each trimming depends entirely on how quickly your dog’s nails grow and how quickly they wear their nails down. Lapdogs who’s nails hardly touch the ground may need more attentive grooming, whereas dogs who are constantly out and about and grazing their nails on hard surfaces may need relatively little trimming.
However, it’s estimated that the average dog should have their nails trimmed between every three to five weeks. Similarly, some veterinarians like Dr. Whitney Miller, Head of Veterinary Medicine at PetCo, recommends that you cut your dog’s nails at least once per month.
That being said, we like to operate under a more reliable rule of thumb: you should absolutely trim your dog’s nails when their nails touch the ground while your dog is standing. We view this as a reliable indicator of when your dog’s nails are probably too long for them to walk comfortably.
Trimming a dog’s nails is not for the faint of heart. If trimming your dog’s nails strikes fear into your heart, then– DON”T do it. Simply take your dog to a reputable groomer or your local Veterinarian and have them do this for you. It will be less stress and trauma for both you and your dog.
How to Trim Your Dog’s Overgrown Nails

Trim your dog’s nails gradually.
“Okay,” you say grabbing your guillotine cutter, “Let’s do this!”
Woah, woah. Slow down there.
You can’t just chop off your dog’s overgrown nails!
At the center of their nails are a collection of nerves and blood vessels referred to as “the quick” and, since your dog’s nails are long, their quick is quite long as well. If you just go wantonly chopping off their long nails, you’ll inevitably hit the quick and cause noticeable pain to your pooch.
According to Dr. Karen Gellman of Dogs Naturally Magazine, the key to effectively and safely trimming your dog’s overgrown nails is to encourage the quick to recede by trimming your dog’s nails gradually. After making the initial trims, you should then continue to trim a little, over the course of a regular cadence, until the quick recedes to a safe length.
However, not all pups enjoy having an at-home spa day. If your dog hates having his nails trimmed, you’re going to have to teach him to overcome his fears of nail trimming. In order to do this, you’ll have to engage in what can be weeks-long desensitization training.
First Steps to Trimming Dog Nails
Start by taking out the necessary nail trimming tools and letting your dog investigate them. As your dog begins to show more comfort with the tools, reward them with treats. Repeat this process over a few days until it’s clear your dog has developed a positive association with the tools.
Once a positive association has been established, it’s time to trim. Get your dog into a comfortable position where they can be relaxed. It often helps to have a second person there to hold, pet, and distract your dog. And remember, keep those treats handy! Once he’s relaxed, lift your dog’s paw and hold it close to their body to prevent them from pulling away.
Now it’s time to locate the “quick”
To do this, look at the nail under a good light. For dogs with lighter colored nails, you’re looking for a darker, pinkish section of the nail. When you extend your pet’s “finger” by pressing lightly on it, one at a time, his nail will protrude further and you will see the pinkish Quick WITHIN the nail tissue.
For dogs with darker colored nails, locating the quick may be difficult. According to the Washington State University Veterinary School, the quick on dark colored nails can be identified after making an initial, shallow cut.
After you’ve located the quick, it’s time to start cutting.
Once the initial cut is made, you should be able to see either a grayish-pink oval or a small black dot in the center of the nail. If you see either, you’re close to the quick so it’s time to stop cutting. Moreover, if ever in doubt as to how close you are to the quick…..STOP!
With your preferred tool in-hand, trim a very small bit of nail at a time.
You want to cut at a slight angle across the tip while following the natural shape of the nail.
While you’re cutting, be calm but confident! Trim the nails in a fairly quick and safe motion, but not too fast – you don’t want to cause any accidents.
Then, repeat with each nail!
Do, however, remember —that there’s no real rush to get all nails done at once. More skittish pups may only let you get one or two done at a time, so– be happy with that. Please don’t rush it.
You want to make sure your pup is as comfortable as possible to avoid any sudden movements, on his part, such as pulling his paw away from you, that may cause an accident. So it’s okay if you have to take several minutes between each nail or several days to get the whole job done.
Most importantly, make sure to offer your dog lots of praise and treats throughout the process! You want to reward their cooperation and bravery during this undoubtedly stressful moment!
Using a Dremel Tool to Trim Your Dog’s Nails
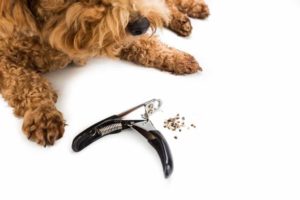
Dog nail trimming tool
For some dogs and their owners, using a Dremel tool seems to be a safer option to trim nails.. Yes, it’s a more noisy technique and that’s something you’ll need to get your dog used to but it’s a more gradual procedure than a dog nail cutter. It’s a process that you can use on your dog, say, once a month to keep his nails in constant, good shape and can be considerably less risky than using dog nail cutters.
What to Do if You Hit the Quick While Trimming Your Dog’s Nails
So, you’ve done it. You hit the quick.
Sigh
It’s okay. It happens to the best of us.
First thing’s first: quickly reassure that scared pup who’s in pain that everything is all right by giving them lots of pets and affection.
Then, jump into First Aid mode.
You’ll want to immediately compress the wound for a minute or two with a clean cloth or paper towel to stop any bleeding that may be occurring.
If the bleeding is minor, you can rub a bar of clean, unscented soap on the wound to begin cleaning it.
If the bleeding is steady, you’ll want to wrap the wound with a compressed cloth containing ice to stave off the blood flow.
After, you should then dip the affected nail into a mixture of cornstarch and baking soda. This step induces the blood to coagulate and stop flowing. You can also purchase a mixture from your pet store designed specifically for this task—stopping the blood flow. You can compare it with a nick or cut that a guy gets on his face when shaving.
Once bleeding stops, continue to slightly compress their wound with the iced paper towel or cloth. Then, wash the affected nail with lukewarm water and bandage it to prevent the possibility of infection.
If bleeding does not stop after 20 to 30 minutes following the above treatment steps, a veterinarian must be consulted as this indicates that proper blood clotting is not occurring.
Reach for Banixx
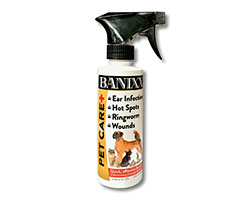
Banixx Pet Spray
However, if after a few days you notice that the affected nail is beginning to show signs of an infection, don’t fret: reach for Banixx Pet Care.
Banixx is a clinically-proven treatment that provides instant, sting-free, odorless relief to your four-legged friend without relying on pesky antibiotics or steroids. Simply identify the affected area, apply Banixx twice daily, and wait. Within minutes, your dog should be happily bounding up to you ready to go to the vet for a more serious evaluation. With Banixx, relief really can be that simple.
We hope you found this article helpful and if your dog ever gets any cuts, abrasions, ear infections or hot spots, we hope you keep Banixx Pet Care in mind. We have a variety of informative and unusual dog topics in our dog blog….just check it out!
Keep trotting back to us for tips to you keep your dog’s tail wagging with wellness and for any skin calamity or infection reach for your bottle of Banixx Pet Care. You don’t have one? click here to find out where to buy Yours. It’s the most trusted, canine-friendly antiseptic solution on the market.
Share this Post
Featured Post

[category_featured_post]
Recent Posts
Apr. 11, 2024
Managing the Mamas –Part 2 –The development process
Apr. 05, 2024
Managing the Mamas: Part 1 – Preparing to Breed Your Mare

Mar. 28, 2024
HOW MANY TOES?? Caring for the Polydactyl Cat

Mar. 22, 2024
Do Dog Joint Supplements Actually Work?

Mar. 15, 2024
Are Laser Pointers Bad for Cats? or, are they Purr-e Fun?
Mar. 08, 2024
Lyme Disease, The Invisible Demon
Top Posts
Nov. 01, 2019
What To Do If Your Dog Has Diarrhea But Acts Fine
Oct. 14, 2019
How To Use Monistat As A Dog Ear Yeast Infection Treatment
Aug. 25, 2019
My Dog Ate A Grape – What Should I Do?
Apr. 30, 2020
Blood In Cat Stool – A Serious Problem
Jun. 5, 2019
Is Benadryl A Good Dog Hot Spot Treatment?
Jan. 15, 2020
What Should I Do About A Rash On My Dog’s Belly?
Nov. 18, 2019
Dog Eye Discharge: When To Worry About Dog Eye Boogers
Nov. 22, 2019
How To Clean Dog Eyes: Boogers, Crust And Stains
Feb. 28, 2020
How Long Should You Quarantine A Cat With Ringworm?
May. 24, 2019
Is Hydrogen Peroxide A Safe Dog Hot Spot Treatment?
Jun. 9, 2020
Hot Spots On Dogs: 10 Things You MUST Know
Jan. 8, 2020
Cat Ear Mites Vs Ear Wax
May. 24, 2020
Dog Ear Infections: What Causes Them & How To Treat Them
Nov. 5, 2019